How to mix paint colors at home (and like the results)
Mixing your own paint at home is one of the most frugal and creative ways to makeover a space or piece of furniture. You don’t need to be a color theory expert to get beautiful results—just a few basic guidelines, a willingness to experiment, and a little common sense.
And let me say this: I’ve mixed some beautiful shades from random leftovers I probably should’ve tossed. It’s paint alchemy, and it’s part of the fun.
Here’s a step-by-step tutorial and troubleshooting guide to help you mix paint confidently at home.
What Paints Mix Well?
- Latex (water-based) paints mix well with other latex paints.
- Acrylic craft paint (like the little bottles you find at craft stores) can be used to tint latex paint in small amounts, especially for craft projects or furniture.
- Chalk paint can often be mixed with latex, but test a small batch first—it may affect adhesion.
- Oil-based paints should not be mixed with water-based paints. They separate and won’t bond correctly.
Tip: Stick to mixing paints that are the same base type (water with water, oil with oil).
Basic Mixing Tips
Lightening a Color
- Add white paint to lighten any color.
- Warm whites will keep your color soft and creamy.
- Bright whites can result in a more pastel or modern shade.
Darkening a Color
- Add black paint carefully — a tiny bit goes a long way.
- You can also darken a color by adding its complementary color (e.g., adding green to red, blue to orange).
- Adding a bit of brown creates a muted, earthy tone.
Making It Chalky or Muted
- Add a bit of gray or cream to soften the saturation.
- If you want a chalky, vintage feel, try adding Plaster of Paris or baking soda for DIY chalk paint. (Great for furniture!)
Making a “Muddy” or Earthy Color
- Mix complementary colors (red + green, blue + orange, yellow + purple) in small amounts.
- You’ll get warm, desaturated tones that work beautifully in rustic or traditional spaces.
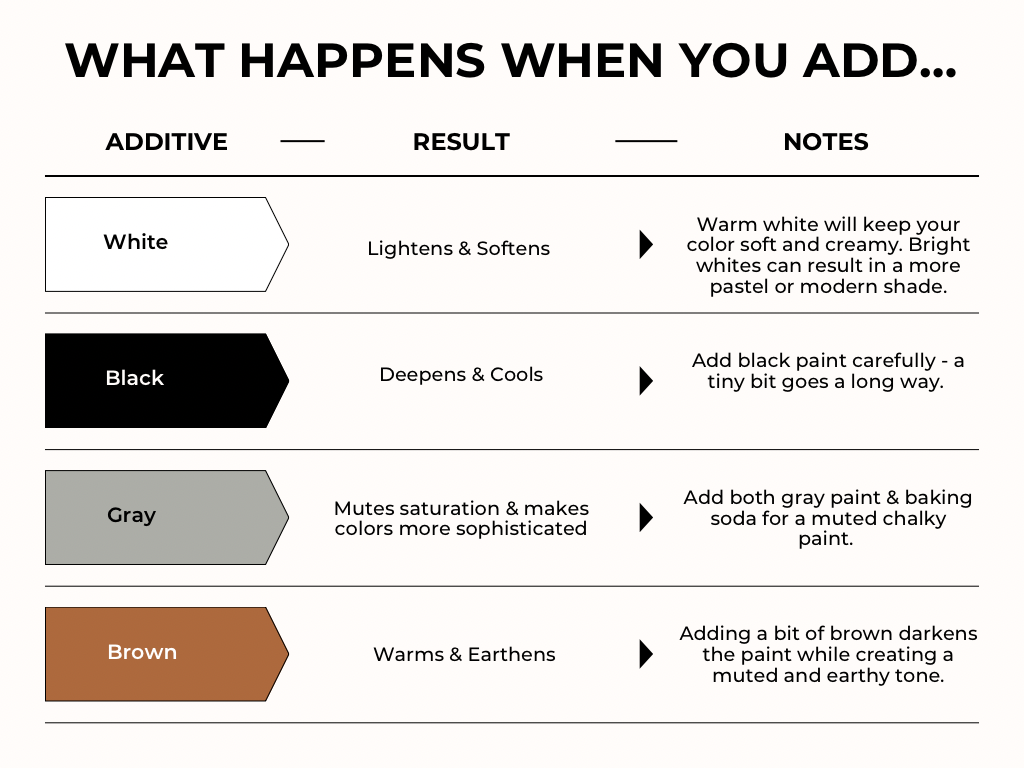
What Happens When You Add…
|
Additive |
Result |
|
White |
Lightens and softens |
|
Black |
Deepens and cools |
|
Gray |
Mutes saturation, makes colors more sophisticated |
|
Brown |
Warms and earths the color |
|
Complementary color |
Mutes and neutralizes (great for subtle shades) |
|
Acrylic craft paint |
Slight tint, best for small batches or detail work |
|
Baking soda or plaster |
Creates chalky, textured paint (best for furniture, not walls) |
How to Mix Paint at Home
Tools You’ll Need:
- Leftover latex paints or tints
- Stir sticks or paint mixer
- Measuring cup (for replicating recipes)
- Clean, empty paint can or container
- Labels and painter’s tape
- Gloves and drop cloth
Steps:
- Start with a base color. Usually white or a neutral leftover paint.
- Add small amounts of other colors. Use teaspoons or tablespoons to start.
- Stir thoroughly between additions to fully blend the color.
- Test your color on a scrap board or a piece of drywall.
- Adjust as needed. Add white to lighten, gray to tone down, etc.
- Once satisfied, label the container. Write the mix recipe on painter’s tape and stick it right to the lid.
Storing Mixed Paint
- Use clean, airtight containers (old paint cans, plastic containers with lids, or mason jars).
- Always label the mix recipe (e.g., “2 parts white, 1 part blue, ½ part gray”).
- Note the date and the type of surface it was intended for.
- Store in a cool, dry place—away from freezing temperatures.
Where It Works Best
Ideal surfaces:
- Furniture
- Accent walls
- Cabinetry (as long as paint quality is decent)
- Decor projects like lamps, planters, trays
Not ideal for:
- High-moisture areas like bathrooms (unless you know the original paint was made for that)
- Exterior projects (unless the paints are exterior-rated)
- Full rooms unless you’re sure you can replicate the shade
Troubleshooting
Color turned out too bright?
→ Add gray, brown, or a bit of the complementary color.
Too dull or muddy?
→ Add a drop or two of a primary color to bring it back to life.
Peeling or poor coverage?
→ Use a bonding primer and always clean the surface before painting.
Not enough for the full project?
→ Stretch it with white or a lighter tone, and use the original shade as an accent.
Final Thoughts
Mixing your own paint is part science, part art—and all thrift. Whether you’re creating a creamy sage for your cabinets or a chalky off-white for an old table, trust your eye and take notes as you go.
And when in doubt? Paint it anyway. The only way to get better is to experiment — and if you mess it up, you can always paint over it. 😉